I’m on PC, but all I can suggest is check the versuin from the Loudmax site is BigSur compatible
IMO… The recording level needs less headroom. Perhaps adding a limiter to prevent clipping during recordings?
This topic seems to come up more often than not and post editing is constantly being suggested.
Please don’t take this the wrong way. I am not saying there is anything wrong with post editing.
However, Post editing should be optional and not mandatory.
The Prime 4 (and other Prime series) are the only consoles I am aware of that records this low.
Here’s a perfect example of the Pioneer DJ XDJ-XZ making a professional recording. This video is from TheDjLab.
Take note of the VU meters during and after the recording.
Yes, That’s correct, they’re exactly the same. Perfect reference recording levels without post editing.
Why can’t the Prime 4 achieve this?
That’s needed ASAP I think the recording level is allways too low.
Thank you so much for this post. I couldn’t get this to work on a Mac (2011 MacBook Pro or 2017 MacBook Air). LoudMax just wouldn’t work. I would set it up, then hit apply, and nothing.
Ultimately I had to use a PC on Windows 10. I did exactly as you suggested and the volume did go up, without distorting the sound. I did have one question though. A couple other people normalized the audio, then set the threshold to -6 and output to -2. How would this differ? I’m curious to try this out and hear the differences. I’m nowhere near an audio engineer, so I wouldn’t know what to listen for. When following this tutorial, I did notice that my recoding did get louder though.
The plug ins are tricky to get working on Mac but somehow i got mine to work. Its more straight forward to install them in Windows
I am no engineer, but i scrub through the mix and find the lowest levels using the vu meter in audacity, i note what the db is, and i used that as the threshold.
I output to -1db, i think mp3s drop by a further 1 db after conversion.
Hi Onyxus
Since writing this, I have been playing with the various levels and found the following to be a good compromise between Loudness and Dynamic Range.
-
Find the Total RMS value of the recording, usually around -20dB if you record your Channels into the first White LED
-
Set the Threshold in Loudmax to around -6dB above this ie -14dB, this then evens out your overall Mix…though never a replacement for making sure your Levels are good in the first place ::
-
Set Output to -2dB, this then raises the overall Peak Level, and allows Headroom for any further processing that may be done by Mixcloud, Soundcloud etc
Thank you so much for the video! I actually tried this method and will listen to the playback to try and compare the other method of removing -6db from the RMS and then using LoudMax too. I’m curious to hear what the difference is. Again, thank you! 
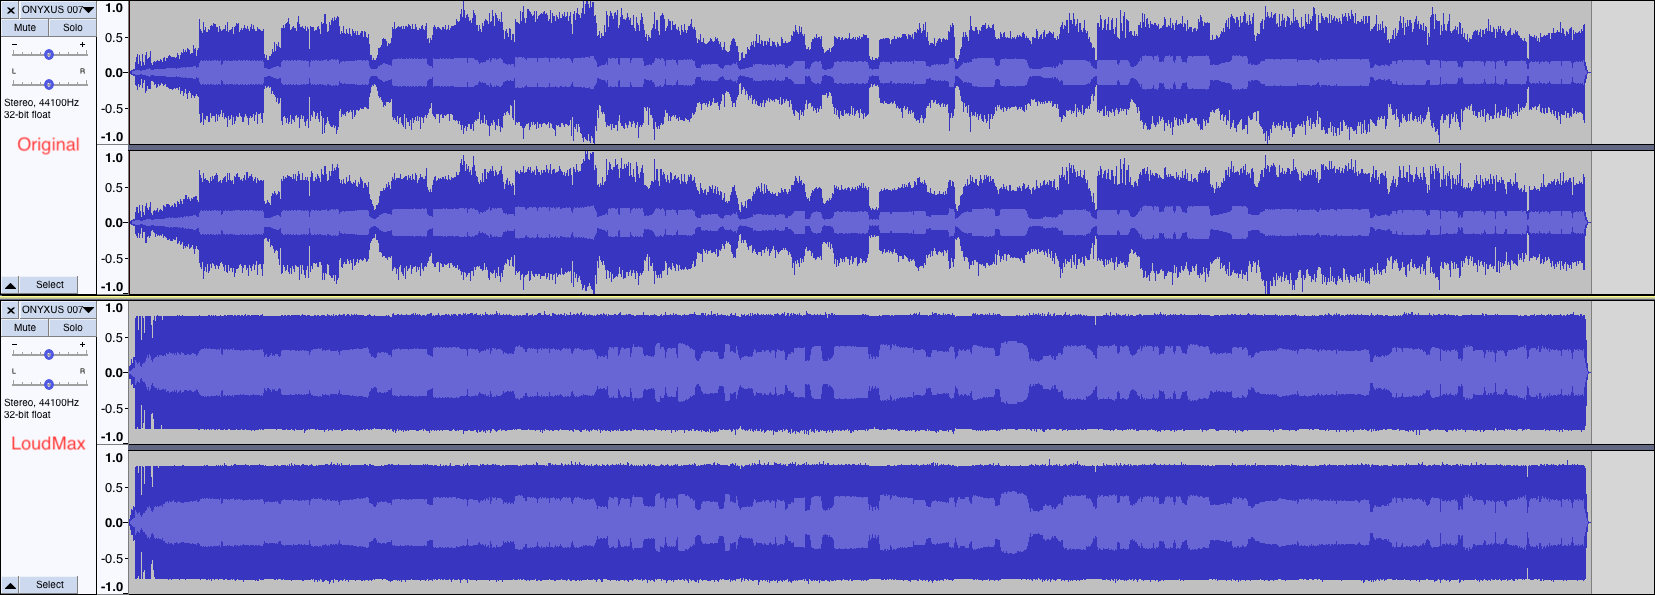
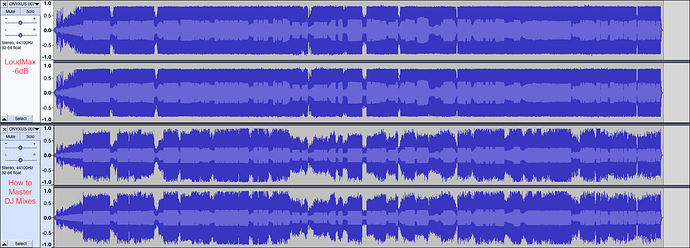
So I’ve tried a few methods that were shared here. The first one was probably what I thought was right and just set up LoudMax to the total RMS and -2dB, then I tried using the video link that @mufasa which was a little bit longer of a process (worth it because my mixes are low af. Lol!), and finally I tried the method that you suggested. These were the waveforms final results, compared to the original ones. Just from viewing them, which one would be “best” adjusted? This is VERY new to me, but I definitely would like to learn how to make my mixes have a better volume level. Thank you!
Side Note: I recorded my mix with my master output to the first white LED level. I read that THAT made recording levels go up too. Again, thanks for the help! ![]()
The two middle waveforms are definitely not good. Looks like some sounds hit the hard limit. Last one seems to be the best - still headroom for some dynamics.
The 3rd one down.
You now have a nice even Waveform, at -2dB Peak, and haven’t crushed Dynamics too much.
Just for Comparison, load in Mastered track you have downloaded from Beatport it Traxsource etc
I’ve booked marked this page…great advice guys!!!
I don’t know if anyone still needs to hear this, but for mac (after copying to files to their respective folders; as suggested in the Readme.txt file), while adding plugins, there would be two options: One is Loudmax and the other one would be Thomas Mundt Loudmax. You need to enable the latter one for the plug-in to work. If you select the former one, you will have the screen as shown in your comment.
Ciao 
Really helpful, thanks @johnnycoombes ! I was just using the normalise and amplify effects in Audacity.
But I noticed that these were making breakdowns and buildups louder, so that when the drops hits, the sound is not that punchy as it’s supposed to be. Maybe I wasn’t doing it right.
Anyways, Loudmax turned out to be a life saver. 
Cheers!
Hi. I am following your steps. How do you do the record trim?
A great contribution to everyone! excellent explanations. I’ve been looking for solutions for weeks. Thank you !
Hello. Do you also normalize it previously?
Experiment went well \s
USB stick wasn’t fast enough to handle the recording so it bottled it ![]()
Is it particularly old or slow?
I use an ancient one for vinyl ripping on my Prime 4 and it writes at under 6MB per second.
(tested with usbdeview software)
Yeah man USB 2.0, lesson learnt lol, SD card next time, I’ve got about a hundred of them
So ive extracted the file from the USB (it recorded about half an hour before the error), the overall level is quite low but chucking it into Audacity, hitting normalise to -1db and its absolutely perfect.
My conclusion, given Audacity is free (as well as many other similar programs) and it takes around 3 minutes to bring it up to level, its far better to have the headroom in the original recording.


